Updated patterns!

I'm in the process of updating my old patterns, particularly the bibs, to include charts. I'm rewriting some of the directions to make the patterns even easier and including alternative methods for beginning the bibs and for making the ties. Look for these patterns in the sidebar to see which ones have been added. It's a slow process, but eventually, they'll all be there!


Wednesday, July 11, 2012

Sweet Tee

At last, here is the pattern for the little t-shirt.  When I first posted the pictures, I had no idea how difficult it would be to write up a pattern!  It's a very easy  to knit, but not so easy to explain!  I hope that in my efforts to make it understandable, I haven't complicated the issue.  Please note that this has not been test knit!  I'm hoping that some of my dedicated followers will be able to help me out with the testing!  I've knit it about six times, but the real test will come when another brain tackles it!


The shirt is knit in the round and the only finishing, other than weaving in ends, is a little button loop at the neck. You begin by knitting back and forth forming the placket as you go and then, when you reach the required depth, you switch and knit it in the round.


The placket is made by making seed stitch borders and, after joining to knit in the round, the stitches are tapered down to a point.  It lays nice and flat without any bulk.


The pdf file is located in the sidebar under "Miscellaneous" or you can just click here.

I do have lots of ideas for variations, but I haven't included them in this pattern.  I want to wait and make sure that the pattern is correct, before I start offering other designs!  I hope you enjoy it and will help me out with testing it!


Sunday, July 1, 2012

Struggling

I bet some of you were wondering if you'd ever hear from me again!  I'd like to have a good excuse for not posting earlier, but the truth is I was just burnt out.  I had absolutely no desire to knit anything.   I didn't feel like reading about knitting or writing about it!   I think a lot of it was an accumulation of failed projects.  Everything I tried to knit, I ended up ripping.  Remember the ladybug soaker?  Too small.  My daughter-in-law did squeeze poor Ruthie into it, but I think it was just for my sake and just for that one day.  It was pretty obvious it didn't fit. Add to all of this, a root canal to just add to my lousy mood!

This was going on for a couple of weeks, when my youngest grandson came to visit.  Marty has a little stuffed animal that he calls his "baby".  It's not very big, but he was dragging this huge crocheted blanket around in case his baby was "cold".  I told him he needed a smaller one, so he said maybe I could knit him one!  Oh dear, how could I say no?  He told me his baby's favorite color was yellow, so we checked out my stash and came up with an intense egg yolk yellow.  Since he was spending the day, I started on it.  It was only about 14 inches wide, but Marty said it was too big, so I had to rip (again) and start over.  This was actually a good thing, because I only had to make it 12 inches, so it went a little faster.  Not fast enough for him though.  We were sitting on my front porch and he remarked that it sure was taking a long time!  Fast forward to dinner.  I was trying to bake something in the oven, I had food on the grill and something on the stove.  Older brother Jack was calling me to go outside on our deck, while Mickey was calling me from the bathroom.  In the midst of all this, Marty marches into the kitchen and demanded to know "Why aren't you knitting, Grandma?"!!!  Too funny.  The blanket did get finished the next day, but I didn't get a picture, since it was snatched up immediately.  I think this was the kick I needed to get going again.

As for that tee shirt, I started writing up the pattern, but I discovered that I didn't take enough notes.  I promise that it's really simple to knit, but not so simple to explain.  I also had a great idea for knitting and finishing the placket at the same time.  It's so much easier than trying to crochet around the edge.  I don't crochet well, and I know that I'm not alone.  The knitted placket looks nicer and lays nice and flat.  I have no choice but to knit another and try to clarify the instructions.  This afternoon looks to be quiet, so I'm hoping to be able to get going on it today!

Finally, here's at least one picture of a recent project that worked out!


This is Kathleen Taylor's pattern called "Purl When Ready" from her Big Book of Socks .  The yarn is Lorna Laces' Solemate.  Basically, you pick out a color and whenever you come to it,  you purl that one color.  It makes an interesting pattern.


You do have to pay attention though.  If you're engrossed in watching a tv movie, it's easy to forget that you're supposed to be purling a specific color!  I left the feet solid so it would be smooth inside shoes.  I did an eye of partridge heel and they are just fun, quick socks.  Jack wanted a rainbow and this meets that request.

I'll start to work on the shirt this afternoon.  I'd ask if anyone would like to test knit it, but since I intend to offer it for free, maybe I'll just post it as is and wait for feedback! 

Wednesday, May 23, 2012

Ladybugs

First, I need to apologize for my last post if I gave the impression that I was going to permanently stop posting bib and cloth patterns.  I only meant that I was moving on to other things temporarily.  Apparently, this caused some confusion judging by the number of comments and personal emails I received.  I'm flattered to hear from so many of you, but I'm sorry if I scared you into commenting!

I'm still working on the t-shirt pattern.  I've knit a couple more, including this variation with a butterfly and an eyelet trim:


Check out the cute button:


I also did a plain version with a ladybug:


It's hard to see in this picture and I'm not as thrilled with it as I hoped I would be.

Both were knitted with Universal Yarn Cotton Supreme.  This is a worsted weight and may just be the softest yarn I've ever felt!  It's 100% cotton and is put up in 180 yard skeins.  It's wonderful to work with and each shirt only took one skein.  I didn't have a lot to spare when I was done, but I didn't feel like I was cutting it close either! 

I was inspired to make a ladybug soaker to match.


I found the pattern on Ravelry here.  It was so much fun to knit. Sandra has so many cute patterns and I can't wait to try a few more!


You only use two colors at a time.  I used Cascade Sport 220 which might not have been the best choice for a soaker.  However, because the yarn is stranded, it adds an extra layer to make up for the lighter weight.  When I reached the crotch, I needed to keep the thickness so I used the same method I do for the heels of socks.  First row is "slip 1, k1, etc" and the next row is purled.  I was pleased with the results and it's just a fluke that the butterfly shirt also matches the soaker!


As for the shirt pattern, I'm still trying to work out the kinks.  I can already tell that it needs to be longer, however, before I go any further, I need to have Baby Ruth (or "Babe Ruth" as she's known in our family) try it on.  It might be important to have a shirt that actually fits, don't you think?? 


Finally, I want to address a question that Ally left me in the comments.  She said she was having a problem with her I-cords looking neat.  I  have a couple of suggestions.  First, after you're done knitting them, give them a couple of good hard tugs.  Also you can do what I do and pin each end to an ironing board and stretch them out, then give them a good steaming.  Don't let the iron touch the fabric, but hold it above it and really hit it with steam.  This is also how I block my bibs.  Of course, you could always try using my crochet method.  Crocheting the ties is pretty easy and so fast.  I will admit that you almost always have to steam them with this method.  They look like curly fries otherwise.  Hope this helps!

Tuesday, May 15, 2012

T-shirts!

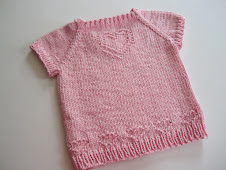
Well, judging from the underwhelming response to my last two patterns, I guess I should just move onto something else.  Like baby t-shirts.  I searched for a pattern that would match up with the one I had in my mind, but nothing really came close.  As is the case for most of the things I do, I decided that the only way to get what I wanted was to do it myself! 


I hate sewing seams, so I knew I wanted a top down shirt, but I also wanted to be able to slip it off and on easily over baby's head.  This would require a placket.


Of course, I had to add a little design to the front.


And to the bottom:
I think it came out really cute.  You start at the neck and work back and forth, while also working the design on the front until the placket is deep enough, and then it's worked in the round until the depth of the armholes is reached.  You then slip the sleeve stitches onto waste yarn to work later and knit to the bottom.  I wanted small sleeves, so when I picked up the stitches, I just did the tiny ribbing at the edge to finish them off.  It was really simple.  The tricky part was figuring out how many stitches to cast on in the first place.  I was trying to avoid a Flashdance look!

I have tons of ideas for other designs, but one that popped into my head was this lacy one:
I love this version!  The lace will make it nice and cool on a summer day!  It's not completely finished as I haven't found the right button for it yet.  I finished the placket off by just single crocheting around the edge and making a buttonhole at the same time.  I thought it made more sense to finish it once I knew how big the button was.  I didn't want to have a loop that wouldn't stay on the button or one that wouldn't fit over a button!


The peach version has fewer stitches around the neck so it isn't as floppy.  I can see lots of things I'd like to improve upon.  Both versions are knit with cotton.  The aqua shirt is made from leftover yarn from the blanket.  (Jeannee by Plymouth).  The peach is Aslan Trends Pima Clasico.  It's supposed to be machine washable, but I haven't put it to the test yet!

I'm contemplating trying to write up the pattern, in case anyone else might be interested, however, I've never written a "sweater" pattern before so I'm not sure if I'd be any good at it.  I know what I did, but can I explain it well enough so you'd know too?  I can see that it would be fairly easy to adjust the size up or down, but if I decide to do it, I think I'll just stick with one size.  I've learned that I can't please everyone!


Friday, May 11, 2012

Hablas espanol?

No.  I don't speak Spanish* despite taking it in college.  (College was a long time ago!)  However, if you do speak Spanish, then you might be interested to know that a very nice knitter from Spain asked me for permission to translate my patterns.  There's a Spanish group called "Nuevos Baberos" which can be accessed here.  They have already translated the heartbeat bib:


This is one of my favorite designs so I'm happy that they chose this as their first bib.  The direct link for the pattern is here.  I'm not sure if they've done any others, because I don't speak Spanish and I have no idea what they're saying.  Hopefully, if they're talking about me, they're being nice!

(*Yes, I do know that I need an upside down question mark in front of Hablas, but neither my keyboard nor Blogger will let me insert it!)

Tuesday, May 1, 2012

A Tail of Two Bunnies

Every year I always try and post a brand new pattern on the anniversary of my blog.  That was my intention this year also, except that I completely missed the date!  I thought it was the last day of April but it turns out that it was April 1st instead.  Well, so much for that idea!  To make up for my poor memory, I decided to post two patterns for you!


This is "A Tail of Two Bunnies".  When I was designing Ruthie's blanket, I wanted to add a bunny to the mix.  At first, I designed the bunny with the tail and was pretty happy with it, until I realized that almost all of the other designs in the blanket were head shots. The bunny with a tail stuck out (to me anyway) and so I went back to the drawing board and drew just the bunny's head.


I couldn't decide which one to post, so I just decided to do both and, since this is basically the same bunny, I combined the two into one pattern.


I want to thank my good friend, Denise, for helping me out.  She did a knitting marathon of both designs so I could post these as quickly as I have.  With her permission, here are her bunnies:


Didn't she do a fabulous job?  Then again, she always does a fabulous job, both with the knitting and with catching my typos!  I'm so lucky to have her helping me out!

You can get the pdf file by clicking the links in the side bar, or by clicking here for the bib patterns or by clicking here for the cloth patterns.

I wish I knew how to post a poll, so I could see which design is your favorite. You'll have to leave me a comment with your pick!

Finally, you might be interested to know that my original post was April 1, 2008.  Four years ago!  It just doesn't seem possible.  I'm so grateful to all of my followers and to all of you kind enough to leave me your comments.

Tuesday, April 10, 2012

Ruthie's Farm

I guess it was inevitable that I would end up re-knitting this blanket and now that it's finished, I'm glad that I did! 


As you can see, I changed the border and added four more squares.  I really love the heartbeat design and, since I also love my little Ruthie, I decided to add a heart to each row.  I also changed the yarn from Plymouth Encore to Plymouth Jeannee.  This is a cotton blend yarn and is so soft.  You can just toss it in the washer and dryer which is important for babies.   The only drawback to the yarn is the yardage.  There's only about 110 yards in a ball so you do go through it fairly quickly and then you're left with all those ends to weave in!  On the plus side, it's fairly inexpensive and it comes in gorgeous colors.  Ruthie's blanket is a very pretty shade of aqua which my camera won't capture.  In these pictures, it looks like a gray green, and what's with this pink background?  I have it spread out on pure white sheets! 

If you look close, you'll see that I have four new designs in the blanket.  There's the hen:

And there's a new pig and a new rabbit. 

The goose is new too, but after knitting it in the original blanket, I decided that it needed to be scaled down a bit and I'm much happier with the leaner version.  (If only I could do that for myself!)


The dog and the cat are not new. They were the designs I did for the 2010 Dishcloth calendar only I tweaked them by eliminating the heart border.

I decided that the border needed some interest so I added the knit stripe.
Now, I know that some of you will want the basics, so here, in a nutshell is how I knit the blanket.  First, pick out which patterns you want and how many.  All of these patterns have the same stitch and row count.  I used 16 designs and my blanket measures approximately 31" x 34".  I used a U.S. Size 6 needle. I think it's a nice size to make it practical for just wrapping around the baby.  The side borders are 9 stitches of seed stitch, 3 knit stitches and 7 stitches more of seed stitch for the inner border.  Each design was done without the borders called for in the patterns which resulted in 27 stitches per design.  I knit seven seed stitches between the designs and finished with the 3 knit stitches and 9 seed stitches for the outside border.  The outside top and bottom borders have 14 rows of seed stitch and then I knit one row, purled one row, for a total of 4 rows while at the same time keeping the first and last 9 stitches in the established seed stitch pattern.  My cast on was 167 stitches total. The inner top and bottom borders have 9 rows of seed stitch.

While I do have a number of patterns that use 39 and 38 stitches, most of my designs are 37 stitches wide, so there are a lot to choose from if you want to make your own blanket (and I hope you do!) 
I'm happy to report that the blanket has already been put to use and Ruthie has given it her drool of approval!