I think she did a wonderful job, don't you? Thanks Maureen for sharing!
Wednesday, July 13, 2011
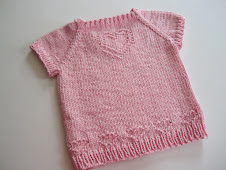
Check this out!
One of the things that I just love about posting patterns is seeing other knitter's projects that use my designs. Awhile ago I received a very nice note from a knitter, named Maureen, who asked for some help with a blanket she was knitting. Imagine my delight when she sent me a picture so I could see it for myself. She's graciously agreed to let me post it, so all of you can see it too!
![]()
Tuesday, July 5, 2011
Peaches & Creme Booklet
As I'm sure most of you know by now, the company that makes the Peaches & Creme yarn, was sold to the same company that makes Sugar and Cream yarn. They are still marketing yarn under the P&C label, but I have no idea if it's the same softness or quality as the original. In any event, I was contacted about creating some designs for a tribute book of patterns. The gal who ran the office (among a billion other things!) has been so nice to the Yahoo Monthly Dishcloth Groups that it would be hard not to participate. I thought you might like to see my contributions.
![]()
![]()
![]()
![]()
![]()
![]()
![]()

First up is a bib I call "Turtle Love". I happen to know that turtles have a special signifcance to Flo and her family and I thought she'd like this one. Here's the matching cloth:

I went through a dozen or more versions, before I found one that I liked.

I try to keep most of my patterns a uniform size, which limits me to only so many stitches. It can be tricky to get a design clear enough so you know right away what it's supposed to be!
For my other pattern, I wanted to use a design that utilized all those pretty variegated yarns.

The pattern uses a slipped stitch that makes this super fast and fun to knit. The pattern is easily memorized and if you use the short rows to begin the bib and make crocheted ties, you can finish it in only a few hours.

It also looks nice in a solid color too, I think.

All those little ridges should be good for catching food!

The booklet is for sale at the Dishcloth Calendar website or by going directly to the Peaches & Creme Booklet page here. The booklet has two versions available. The digital download is $12.00 and a printed version is $14.00, plus $5.00 for shipping. There are about 34 pages and 13 patterns, including dishcloths, my bibs, and a bookmark. There are also two pages of links to other free dishcloths. You can check out other designs that are included in the booklet by going to the calendar website.
Please note that these patterns are only available by purchasing the booklet. I will not be posting them here, so please don't beg me. As you know, 99% of all my patterns are free, so please don't begrudge me a couple of designs for sale! You wouldn't do that, would you?
Monday, July 4, 2011
Monkeying Around
Remember Imp?
![]()
I think this is one of the most popular patterns that I have. Unfortunately, I wrote the pattern over two years ago and since then I have had numerous questions about the instructions. I decided it was time for a complete rewrite, something that I've been planning on doing with all the old patterns. This is the second pattern I've done. (garter stitch bib was the first.) This update now includes alternate directions for using the short rows to begin and also directions for either crocheting or knitting the ties. Also, this pattern now contains a chart. Hopefully, these changes will make life easier for those of you who have struggled.
For the record, when the instructions say, for example: "k1, p1 for 10 stitches" It means the same as if I had written "(k1, p1) x5". You don't knit one stitch and then purl 10 stitches. This has been really confusing for a lot of knitters and I guess I can understand that. What can I say, my pattern writing skills were obviously lacking! I think I'll add a new category in my sidebar where I'll move the patterns that have been updated, so you can spot them easily.
For those of you who celebrate the 4th of July, have a happy holiday!
Monday, June 20, 2011
Little Tweet
As promised, here is the mystery cloth that we just finished up on the Yahoo Monthly Dishcloth group today.
![]()
I thought it was a good cloth to use for springtime, even though tomorrow is the first day of summer. You can use almost any color and "pretend" it's whatever bird you like.
![]()
When I went to take a picture of the matching bib, I discovered that I hadn't knit one! Yikes! Apparently, I just knit two cloths instead. Fortunately, my friend and super test knitter, Denise, came to my rescue and let me use her picture for the bib pattern. I thought I might be able to knit one myself yesterday, even though we were headed to Connecticut to visit with the grandsons for Father's Day. On the way down, I managed to knit half of it and I was sure I'd be able to knit the rest on the trip home, only as fates would have it, I injured my hand and now can barely knit, let alone type. With apologies to the Dishcloth Group, who have already heard the story, I'll repost my account of the "event", but you all have to promise not to laugh :

I thought it was a good cloth to use for springtime, even though tomorrow is the first day of summer. You can use almost any color and "pretend" it's whatever bird you like.

When I went to take a picture of the matching bib, I discovered that I hadn't knit one! Yikes! Apparently, I just knit two cloths instead. Fortunately, my friend and super test knitter, Denise, came to my rescue and let me use her picture for the bib pattern. I thought I might be able to knit one myself yesterday, even though we were headed to Connecticut to visit with the grandsons for Father's Day. On the way down, I managed to knit half of it and I was sure I'd be able to knit the rest on the trip home, only as fates would have it, I injured my hand and now can barely knit, let alone type. With apologies to the Dishcloth Group, who have already heard the story, I'll repost my account of the "event", but you all have to promise not to laugh :
" I was visiting my little grandsons and, being funny, they told me to try and ride my son's new bike. Apparently, they didn't think grandma could do it and, in a complete lack of judgment, I decided to show-off. The bike was a little too high for my short legs and while I started out great, the terrain was rough and I couldn't manage the turn between the swing set and the swimming pool. Unable to catch my balance, I made a spectacular tumble, much to their amusement. I managed to badly bruise my leg and dislocate my finger, but my ego took the worst beating. On the plus side, the boys have new respect for me. On the down side, I can't knit! "
In case you're wondering, the bike is just fine!
Little Tweet Bib

Copyright 2011 by Elaine Fitzpatrick. Permission is granted to make and sell items from this pattern provided that credit is given to me as the designer. Permission is not granted to reproduce the actual pattern, or post it, or distribute it, without my express permission. Please respect my copyright and play nice! Photo is courtesy of Denise Dussault Leduc.
Pdf file and chart are available here.
Size: approximately 8" from neck edge to bottom and 7 ½" wide
Materials: One skein of worsted weight cotton in a solid color such as Peaches & Crème or Sugar ‘n Cream if you are using the bib for meals. If, on the other hand, you want to use it as a “drool” bib, I would recommend using a superwash wool. The cotton has a tendency to absorb the moisture, whereas the superwash wool will wick the moisture and keep baby nice and dry! Sample was done in Peaches & Crème Delft Blue.
Needles: US 5/3.75 mm or 6/4.0mm You want the bib to be fairly dense, so if the fabric is too loose, just drop down a needle size.
2 double pointed needles US 5/3.75 mm for the knitted I-cord ties
or
Size G crochet hook for the crocheted ties
Gauge: 4.5 sts. per inch, not critical.
PATTERN NOTES
This pattern allows you to choose between two methods of beginning the bib. One uses short rows and the other, more traditional way, requires you to cast on stitches at the beginning of the first few rows of the pattern. There are also two methods for doing the ties. One has crocheted ties and the other method uses knitted I-cords. The crocheted ties are slightly thinner. If you do make the knitted ties, you can drop down a needle size when knitting the cords. I like to run a long tail down the center of the cord to finish it off. Be sure to use a straight needle and not one with a bent tip!
Abbreviations:
k = knit
p = purl
psso: pass slipped stitch over
k2tog.= knit 2 stitches together
p2tog.=purl 2 stitches together
sts. = stitches
dec. = decrease
dpn. = double pointed needle
Short Row Version
For this method, you don’t have to wrap stitches or pick up wraps. You just work the stitches to a point and turn your work around and start knitting in the opposite direction. I’ve written out every row for you and I’ve indicated how many stitches you should have remaining at the end of each row. If you lose your count, all you have to do is check on the number of stitches you have left on your needle and you’ll be right back on track. This technique results in a nice smooth edge.
Cast on 37 stitches
Row 1: (k1, p1) x13; turn (11 sts. unworked)
Row 2: Slip 1 knitwise; (k1, p1) x8; k1.; turn (8 sts. unworked)
Row 3: Slip 1 knitwise; (p1, k1) x10; turn (8 sts. unworked)
Row 4: Slip 1 knitwise; (p1, k1) x11; p1; turn (5 sts. unworked)
Row 5: Slip 1 knitwise; (k1, p1) x13; turn (5 sts. unworked)
Row 6: Slip 1 knitwise; (k1, p1) x14; turn (3 sts. unworked)
Row 7: Slip 1 knitwise; (k1, p1) x15; turn (3 sts. unworked)
Row 8: Slip 1 knitwise; (k1, p1) x16; turn (1 sts. unworked)
Row 9: Slip 1 knitwise; (k1, p1) x17; turn (1 sts. unworked)
Row 10: Slip 1 knitwise; (k1, p1) x17; k1.
Row 11: k1, p1, across row.
Continue with *Row 12 of pattern.
OR
Traditional Beginning
Pattern: Cast on 15 sts.
Row 1: p1, k1 across row.
Row 2: Cast on 3 sts., k1, p1 across row. (18 sts.)
Row 3: Cast on 3 sts., k1, p1 across row. (21 sts.)
Row 4: Cast on 3 sts., p1, k1 across row. (24 sts.)
Row 5: Cast on 3 sts., p1, k1 across row. (27 sts.)
Row 6: Cast on 3 sts., k1, p1 across row. (30 sts.)
Row 7: Cast on 3 sts., k1, p1 across row. (33 sts.)
Row 8: Cast on 2 sts., k1, p1 across row. (35 sts.)
Row 9: Cast on 2 sts., k1, p1 across row. (37 sts.)
Row 10: k1, p1 across row.
Row 11: k1, p1 across row.
*Row 12: (k1, p1) x2; k1; p27; k1; (p1, k1) x2.
Row 13: (k1, p1) x2; k29; (p1, k1) x2.
Row 14: (k1, p1) x2; k1; p27; k1; (p1, k1) x2.
Row 15: (k1, p1) x2; k23; p4; k2; (p1, k1) x2.
Row 16: (k1, p1) x2; k1; p27; k1; (p1, k1) x2.
Row 17: (k1, p1) x2; k22; p4; k3; (p1, k1) x2.
Row 18: (k1, p1) x2; k1; p27; k1; (p1, k1) x2.
Row 19: (k1, p1) x2; k22; p3; k4; (p1, k1) x2.
Row 20: (k1, p1) x2; k1; p6; k1; p20; k1; (p1, k1) x2.
Row 21: (k1, p1) x2; k1; p5; k14; p1; k8; (p1, k1) x2.
Row 22: (k1, p1) x2; k1; p8; k1; p10; k3; p5; k1; (p1, k1) x2.
Row 23: (k1, p1) x2; k9; p10; k10; (p1, k1) x2.
Row 24: (k1, p1) x2; k1; p8; k1; p7; k1; p10; k1; (p1, k1) x2.
Row 25: (k1, p1) x2; k10; p1; k9; p1; k8; (p1, k1) x2.
Row 26: (k1, p1) x2; k1; p7; k1; p10; k1; p8; k1; (p1, k1) x2.
Row 27: (k1, p1) x2; k6; p4; k11; p1; k7; (p1, k1) x2.
Row 28: (k1, p1) x2; k1; p6; k1; p10; k1; p4; k2; p3; k1; (p1, k1) x2.
Row 29: (k1, p1) x2; k3; p1; k7; p1; k10; p1; k6; (p1, k1) x2.
Row 30: (k1, p1) x2; k1; p15; k1; p3; k3; p3; k1; (p1, k1) x3.
Row 31: (k1, p1) x2; k3; p1; k1; p1; k3; p1; k2; p1; k9; p1; k6; (p1, k1) x2.
Row 32: (k1, p1) x2; k1; p14; k1; p2; k1; p5; k1; p3; k1; (p1, k1) x2.
Row 33: (k1, p1) x2; k5; p1; k5; p3; k8; p1; k6; (p1, k1) x2.
Row 34: (k1, p1) x2; k1; p14; k1; p6; k1; p5; k1; (p1, k1) x2.
Row 35: (k1, p1) x2; k5; p1; k1; p1; k6; p1; k7; p1; k6; (p1, k1) x2.
Row 36: (k1, p1) x2; k1; p8; k4; p1; k1; p5; (k1, p3) x2; k1; (p1, k1) x2.
Row 37: (k1, p1) x2; k3; (p1, k5) x2; p1; k4; p1; k1; p1; k6; (p1, k1) x2.
Row 38: (k1, p1) x2; k1; (p6, k1) x2; p3; k1; p9; k1; (p1, k1) x2.
Row 39: (k1, p1) x2; k3; p1; k5; p1; k1; p3; k15; (p1, k1) x2.
Row 40: (k1, p1) x2; k1; p6; k1; p16; k1; p3; k1; (p1, k1) x2.
Row 41: (k1, p1) x2; k5; (p1, k3) x2; p1; k8; p2; k5; (p1, k1) x2.
Row 42: (k1, p1) x2; k1; p3; k1; p15; k1; p1; k1; p5; k1; (p1, k1) x2.
Row 43: (k1, p1) x2; k7; p2; (k4, p1) x2; k3; p2; k5; (p1, k1) x2.
Row 44: (k1, p1) x2; k1; p6; k1; p12; k1; p7; k1; (p1, k1) x2.
Row 45: (k1, p1) x2; k13; p1; k15; (p1, k1) x2.
Row 46: (k1, p1) x2; k1; (p6, k1) x2; p13; k1; (p1, k1) x2.
Row 47: (k1, p1) x2; k15; p1; k4; p1; k8; (p1, k1) x2.
Row 48: (k1, p1) x2; k1; p8; k4; p15; k1; (p1, k1) x2.
Row 49: (k1, p1) x2; k29; (p1, k1) x2.
Row 50: (k1, p1) x2; k1; p27; k1; (p1, k1) x2.
Row 51: (k1, p1) x3; k25; (p1, k1) x3.
Row 52: (k1, p1) x3; k1; p23; k1; (p1, k1) x3.
Row 53: (k1, p1) x4; k21; (p1, k1) x4.
Row 54: (k1, p1) x4; k1; p19; k1; (p1, k1) x4.
Row 55: (k1, p1) x5; k17; (p1, k1) x5.
Rows 56 – 62: k1, p1 across row.
Row 63: k1, p1 for 13 sts. Slip sts. just worked onto stitch holder, bind off the next 11 stitches knitwise; work across remaining sts. in established pattern: 13 stitches each side.
NECK AND SHOULDER SHAPING – LEFT SHOULDER
Note: As you look at the bib with the right side facing, the first shoulder worked will be the left side. All the decreases are made on right side or odd numbered rows.
Row 64: (wrong side) k1, p1 across row.
Neck decreases:
Row 65: Slip 1 knitwise, k1, psso; k1, p1 across row. (12 sts.)
Row 66: k1, p1 across row.
Row 67: Slip 1 knitwise, k1, psso; p1, k1 across row. (11 sts.)
Row 68: k1, p1 across row.
Shoulder decreases:
Row 69: k1, p1 across to last 2 sts, p2tog. (10 sts.)
Row 70: p1, k1 across row.
Row 71: k1, p1 across to last 2 sts., k2tog. (9 sts.)
Row 72: k1, p1 across row.
Row 73: k1, p1 across to last 2 sts., p2tog. (8 sts.)
Row 74: p1, k1 across row.
Row 75: k1, p1 across to last 2 sts., k2tog. (7 sts.)
Row 76: k1, p1 across row.
Row 77: k1, p1 across to last 2 sts., p2tog. (6 sts.)
Row 78: p1, k1 across row.
Row 79: k1, p1 across to last 2 sts., k2tog. (5 sts.)
Row 80: k1, p1 across row.
Row 81: Slip 1 knitwise, k1, psso; k1, p2 tog. (3 sts.)
For the crocheted ties, slip your crochet hook through the three stitches and draw your yarn through. Then work a chain for about 12 - 14 inches. The crocheted ties are not as stretchy as the knitted ones, so you might want to make these slightly longer. When you reach the desired length, work back on the chain by inserting your hook in the second chain stitch nearest the end and slip stitch in each chain until you are back to the beginning. Fasten the yarn securely and weave in the ends. I have a “mini-tutorial” for making the crocheted ties on my blog. http://downcloverlaine.blogspot.com/2010/05/ties-that-bind.html
For the knitted ties, slip these 3 sts. to a dpn work an I-cord for approximately 12 inches. Fasten off and run end down through middle of I-cord. Don't worry if the
I-cords look a little wonky. A firm tug will usually straighten them out and after the bib is washed, you won't even notice! A good tutorial for making the I-cords can be found here: http://www.knittinghelp.com/videos/knitting-tips
NECK AND SHOULDER SHAPING – RIGHT SHOULDER
With wrong side facing, slip sts. from stitch holder to left needle and join yarn at neck edge. All the decreases are made on right side or odd numbered rows.
Row 64: (wrong side) k1, p1 across row.
Neck decreases:
Row 65: k1, p1 across to last 2 sts., p2tog. (12 sts.)
Row 66: p1, k1 across row.
Row 67: k1, p1 across to last 2 sts., k2tog. (11 sts.)
Row 68: k1, p1 across row.
Shoulder decreases:
Row 69: Slip 1 knitwise, k1, psso; k1, p1 across row. (10 sts.)
Row 70: k1, p1 across row.
Row 71: Slip 1 knitwise, k1, psso; p1, k1 across row. (9 sts.)
Row 72: k1, p1 across row.
Row 73: Slip 1 knitwise, k1, psso; k1, p1 across row. (8 sts.)
Row 74: k1, p1 across row.
Row 75: Slip 1 knitwise, k1, psso; p1, k1 across row. (7 sts.)
Row 76: k1, p1 across row.
Row 77: Slip 1 knitwise, k1, psso; k1, p1 across row. (6 sts.)
Row 78: k1, p1 across row.
Row 79: Slip 1 knitwise, k1, psso; p1, k1 across row. (5 sts.)
Row 80: k1, p1 across row.
Row 81: Slip 1 knitwise, k1, psso; k1; p2tog. (3 sts.)
Work tie to correspond with the one you worked for the other side.
Weave in ends.
Little Tweet Cloth

Copyright 2011 by Elaine Fitzpatrick. Permission is granted to make and sell items from this pattern provided that credit is given to me as the designer. Permission is not granted to reproduce the actual pattern, or post it, or distribute it, without my express permission. Please respect my copyright and play nice!
Pdf file and chart is available here.
Size: approximately 8" X 8 ¼ ".
Materials: One skein of worsted weight cotton in a solid color. The cloth pictured was done in Peaches & Crème in Delft Blue.
Needles: U.S. Size 6/4.0mm or 5/3.75mm Because this is a “picture” cloth, you want your fabric to be fairly dense so the design will pop out. If you are a loose knitter, then you might want to drop down a needle size.
Gauge: 4.5 sts. per inch, not critical.
Abbreviations:
k = knit
p = purl
sts. = stitches
Pattern:
Cast on 37 stitches
Rows 1 – 7: k1, p1 across row.
Row 8: (k1, p1) x2; k1; p27; k1; (p1, k1) x2.
Row 9: (k1, p1) x2; k29; (p1, k1) x2.
Row 10: (k1, p1) x2; k1; p27; k1; (p1, k1) x2.
Row 11: (k1, p1) x2; k23; p4; k2; (p1, k1) x2.
Row 12: (k1, p1) x2; k1; p27; k1; (p1, k1) x2.
Row 13: (k1, p1) x2; k22; p4; k3; (p1, k1) x2.
Row 14: (k1, p1) x2; k1; p27; k1; (p1, k1) x2.
Row 15: (k1, p1) x2; k22; p3; k4; (p1, k1) x2.
Row 16: (k1, p1) x2; k1; p6; k1; p20; k1; (p1, k1) x2.
Row 17: (k1, p1) x2; k1; p5; k14; p1; k8; (p1, k1) x2.
Row 18: (k1, p1) x2; k1; p8; k1; p10; k3; p5; k1; (p1, k1) x2.
Row 19: (k1, p1) x2; k9; p10; k10; (p1, k1) x2.
Row 20: (k1, p1) x2; k1; p8; k1; p7; k1; p10; k1; (p1, k1) x2.
Row 21: (k1, p1) x2; k10; p1; k9; p1; k8; (p1, k1) x2.
Row 22: (k1, p1) x2; k1; p7; k1; p10; k1; p8; k1; (p1, k1) x2.
Row 23: (k1, p1) x2; k6; p4; k11; p1; k7; (p1, k1) x2.
Row 24: (k1, p1) x2; k1; p6; k1; p10; k1; p4; k2; p3; k1; (p1, k1) x2.
Row 25: (k1, p1) x2; k3; p1; k7; p1; k10; p1; k6; (p1, k1) x2.
Row 26: (k1, p1) x2; k1; p15; k1; p3; k3; p3; k1; (p1, k1) x3.
Row 27: (k1, p1) x2; k3; p1; k1; p1; k3; p1; k2; p1; k9; p1; k6; (p1, k1) x2.
Row 28: (k1, p1) x2; k1; p14; k1; p2; k1; p5; k1; p3; k1; (p1, k1) x2.
Row 29: (k1, p1) x2; k5; p1; k5; p3; k8; p1; k6; (p1, k1) x2.
Row 30: (k1, p1) x2; k1; p14; k1; p6; k1; p5; k1; (p1, k1) x2.
Row 31: (k1, p1) x2; k5; p1; k1; p1; k6; p1; k7; p1; k6; (p1, k1) x2.
Row 32: (k1, p1) x2; k1; p8; k4; p1; k1; p5; (k1, p3) x2; k1; (p1, k1) x2.
Row 33: (k1, p1) x2; k3; (p1, k5) x2; p1; k4; p1; k1; p1; k6; (p1, k1) x2.
Row 34: (k1, p1) x2; k1; (p6, k1) x2; p3; k1; p9; k1; (p1, k1) x2.
Row 35: (k1, p1) x2; k3; p1; k5; p1; k1; p3; k15; (p1, k1) x2.
Row 36: (k1, p1) x2; k1; p6; k1; p16; k1; p3; k1; (p1, k1) x2.
Row 37: (k1, p1) x2; k5; (p1, k3) x2; p1; k8; p2; k5; (p1, k1) x2.
Row 38: (k1, p1) x2; k1; p3; k1; p15; k1; p1; k1; p5; k1; (p1, k1) x2.
Row 39: (k1, p1) x2; k7; p2; (k4, p1) x2; k3; p2; k5; (p1, k1) x2.
Row 40: (k1, p1) x2; k1; p6; k1; p12; k1; p7; k1; (p1, k1) x2.
Row 41: (k1, p1) x2; k13; p1; k15; (p1, k1) x2.
Row 42: (k1, p1) x2; k1; (p6, k1) x2; p13; k1; (p1, k1) x2.
Row 43: (k1, p1) x2; k15; p1; k4; p1; k8; (p1, k1) x2.
Row 44: (k1, p1) x2; k1; p8; k4; p15; k1; (p1, k1) x2.
Row 45: (k1, p1) x2; k29; (p1, k1) x2.
Row 46: (k1, p1) x2; k1; p27; k1; (p1, k1) x2.
Row 47: (k1, p1) x3; k25; (p1, k1) x3.
Row 48: (k1, p1) x3; k1; p23; k1; (p1, k1) x3.
Row 49: (k1, p1) x4; k21; (p1, k1) x4.
Row 50: (k1, p1) x4; k1; p19; k1; (p1, k1) x4.
Row 51: (k1, p1) x5; k17; (p1, k1) x5.
Rows 52 - 58: k1, p1 across row.
Bind off in k1, p1 and weave in ends.
Subscribe to:
Posts (Atom)