Thursday, July 16, 2009
Petit Fleurs
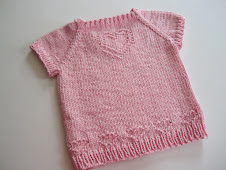
Okay, so as promised, here is the final design that I did for last year's Dishcloth Calendar. As usual, I've also included a pdf file in the side bar. This is the very first bib that I designed specifically for girls. I wanted something a little different and dainty. I'm used to doing designs with pictures, but at the time, I just couldn't seem to come up with anything! Boys are definitely much easier to design for, in my opinion! If you're interested in checking out a couple of the designs that I did for this year's calendar, click on this link and just scroll down. Pictures of two of my designs are posted. I also did a third one, which hasn't been posted, but it coordinates with the other two. I think this year's calendar is going to be better than ever! It has a heart theme and who doesn't like hearts?
Petit Fleurs Bib

Copyright 2008 by Elaine Fitzpatrick. Permission is granted to make and sell items from this pattern provided that credit is given to me as the designer. Permission is not granted to reproduce the actual pattern, or post it, or distribute it, without my express permission. Please respect my copyright and play nice!
Difficulty: Easy
Size: approximately 8.75" from neck to bottom and 8" wide
Materials: One skein of worsted weight cotton if you are using the bib for meals. If, on the other hand, you want to use it as a “drool” bib, I recommend using a superwash wool. The cotton has a tendency to absorb the moisture, whereas the superwash wool will wick the moisture and keep baby nice and dry! Sample was done in Peaches & Crème Pastel Pink.
Needles: U.S. Size 6 (4 mm)
Gauge: 4.5 sts. per inch, not critical
Abbreviations:
k = knit
p = purl
sts. = stitches
dec. = decrease
Pattern Notes: The border of this cloth may look like a straight seed stitch, however, in order to keep the defined scallop border, there are rows where the stitch sequence varies. If you keep this in mind and keep an eye on the pattern, you shouldn’t have any problems!
Pattern: Cast on 15 sts.
Row 1: (right side) p1, k1 across row.
Row 2: Cast on 3 sts., k1, p1 across row. (18 sts.)
Row 3: Cast on 3 sts., k1, p1 across row. (21 sts.)
Row 4: Cast on 3 sts., p1, k1 across row. (24 sts.)
Row 5: Cast on 3 sts., p1, k1 across row. (27 sts.)
Row 6: Cast on 3 sts., k1, p1 across row. (30 sts.)
Row 7: Cast on 3 sts., k1, p1 across row. (33 sts.)
Row 8: Cast on 2 sts., k1, p1 across row. (35 sts.)
Row 9: Cast on 2 sts., k1, p1 across row. (37 sts.)
Row 10: k1, p1 across row.
Row 11: k1, p1, across row.
Row 12: k1, p1, across row.
Row 13: k1, p1 for 7 sts.; [p3; k1, p1 for 7 sts.] 3 times.
Row 14: k1, p1 for 7 sts.; [p3; k1, p1 for 7 sts.] 3 times.
Row 15: k1, p1 for 6 sts.; [k5; p1, k1 for 5 sts.] 2 times; k5; p1, k1 for 6 sts.
Row 16: k1, p1 for 5 sts.; [p7, k3] 2 times; p7; k1, p1 for 5 sts.
Row 17: k1, p1 for 3 sts.; p2; k27; p2, k1, p1 for 3 sts.
Row 18: k1, p1 for 5 sts.; p27; k1; p1 for 5 sts.
Row 19: k1, p1 for 6 sts.; k12; p1; k12; p1, k1 for 6 sts.
Row 20: k1, p1 for 7 sts.; p10; k1, p1, k1; p10; k1, p1 for 7 sts.
Row 21: k1, p1 for 8 sts; k10; p1; k10; p1, k1 for 8 sts.
Row 22: k1, p1 for 6 sts., k2; p21; k2; p1, k1 for 6 sts.
Row 23: k1, p1 for 8 sts., k4; p1, k11; p1; k4; p1, k1 for 8 sts.
Row 24: k1, p1 for 7 sts.; p4; k1; p1; k1; p9; k1; p1; k1; p4; k1, p1 for 7 sts.
Row 25: k1, p1 for 6 sts.; k6; p1; k11; p1; k6; p1, k1 for 6 sts.
Row 26: k1, p1 for 5 sts.; p27; k1, p1 for 5 sts.
Row 27: k1, p1 for 3 sts.; p2; k13; p1; k13; p2; k1, p1 for 3 sts.
Row 28: k1, p1 for 5 sts.; p12; k1; p1; k1; p12; k1, p1 for 5 sts.
Row 29: k1, p1 for 6 sts.; k12; p1; k12; p1, k1 for 6 sts.
Row 30: k1, p1 for 7 sts.; p23; k1, p1 for 7 sts.
Row 31: k1, p1 for 8 sts.; k4; p1; k11; p1; k4; p1, k1 for 8 sts.
Row 32: k1, p1 for 6 sts.; k2; p3; k1; p1; k1; p9; k1; p1; k1; p3; k2; p1, k1 for 6 sts.
Row 33: k1, p1 for 8 sts.; k4; p1; k11; p1; k4; p1, k1 for 8 sts.
Row 34: k1, p1 for 7 sts.; p23; k1; p1; for 7 sts.
Row 35: k1, p1 for 6 sts.; k12; p1; k12; p1, k1 for 6 sts.
Row 36: k1, p1 for 5 sts.; p12; k1; p1; k1; p12; k1, p1 for 5 sts.
Row 37: k1, p1 for 3 sts.; p2; k13; p1; k13; p2; k1, p1 for 3 sts.
Row 38: k1, p1 for 5 sts.; p27; k1, p1 for 5 sts.
Row 39: k1, p1 for 6 sts.; k6; p1; k11; p1; k6; p1, k1 for 6 sts.
Row 40: k1, p1 for 7 sts.; p4; k1; p1; k1; p9; k1; p1; k1; p4; k1, p1 for 7 sts.
Row 41: k1, p1 for 8 sts.; k4; p1; k11; p1; k4; p1, k1 for 8 sts.
Row 42: k1, p1 for 6 sts.; k2; p21; k2; p1, k1 for 6 sts.
Row 43: k1, p1 for 8 sts.; k10; p1; k10; p1, k1 for 8 sts.
Row 44: k1, p1 for 7 sts.; p10; k1; p1; k1; p10; k1, p1 for 7 sts.
Row 45: k1, p1 for 6 sts.; k12; p1; k12; p1, k1 for 6 sts.
Row 46: k1, p1 for 5 sts.; p27; k1, p1 for 5 sts.
Row 47: k1, p1 for 3 sts.; p2; k7; p1, k11; p1; k7; p2; k1, p1 for 3 sts.
Row 48: k1, p1 for 5 sts.; p6; k1; p1; k1; p9; k1; p1; k1; p6; k1, p1 for 5 sts.
Row 49: k1, p1 for 6 sts.; k6; p1; k11; p1; k6; p1, k1 for 6 sts.
Row 50: k1, p1 for 7 sts.; p23; k1, p1 for 7 sts.
Row 51: k1, p1 for 8 sts.; k10; p1; k10; p1, k1 for 8 sts.
Row 52: k1, p1 for 6 sts.; k2; p9; k1; p1; k1; p9; k2; p1, k1 for 6 sts.
Row 53: k1, p1 for 8 sts.; k10; p1; k10; p1, k1 for 8 sts.
Row 54: k1, p1 for 9 sts.; p19; k1, p1 for 9 sts.
Row 55: k1, p1 for 10 sts.; k17; p1, k1 for 10 sts.
Row 56: k1, p1 for 10 sts.; k17; p1, k1 for 10 sts.
Row 57: k1, p1 across.
Row 58: k1, p1 across.
Row 59: k1, p1 across.
Row 60: k1, p1 across.
Row 61: k1, p1 across.
Row 62: k1, p1 across.
Shoulder Shaping:
Row 63: k1, p1 for 13 stitches; bind off the next 11 stitches knitwise, and work the remaining stitches in the established seed stitch. You should have 13 sts. on each side.
Next row: p1, k1 across and place first 13 stitches on a holder. Work on remaining 13 sts. as follows:
Note: As you look at the bib, this will be the left side. All the decreases are made on right side rows. I have included a couple of tips below.
(Right side) Dec. 1 st. at neck edge every other row 2 times. (11 sts.)
(Tip: I find it easiest to decrease these neck stitches by slipping the first stitch knitwise, then knitting the next stitch, and passing the slipped stitch over the knitted stitch. Because the cotton is heavy, it can be a little difficult to slip two stitches and then knit them together.)
Work one row.
(Right side) Dec. 1 st. at shoulder edge every other row until 5 sts. remain. (For these decreases, you should knit the last two stitches together.)
Work one row.
(Right side) Dec. 1 st. at neck edge and 1 st. at shoulder edge. 3 sts.
Slip these 3 sts. to a dpn and work an I-cord for approximately 12 inches. Fasten off and run end down through middle of I-cord. Don’t worry if the I-cords look a little wonky. A firm tug will usually straighten them out and after the bib is washed, you won’t even notice! A good tutorial for making the I-cords can be found here: http://www.knittinghelp.com/videos/knitting-tips
Join yarn to neck edge and work right side to correspond to the left side.
(Tip for right shoulder) Join the yarn at the neck edge and knit across row. On the next row (right side), decrease at the neck edge by knitting the last two stitches together. For the shoulder edge, decrease by slipping the first stitch knitwise, knitting the next stitch, and then passing the slipped stitch over the knitted stitch.)
Weave in ends.
Petit Fleurs Cloth

Copyright 2008 by Elaine Fitzpatrick. Permission is granted to make and sell items from this pattern provided that credit is given to me as the designer. Permission is not granted to reproduce the actual pattern, or post it, or distribute it, without my express permission. Please respect my copyright and play nice!
Difficulty: Easy
Size: approximately 8.25" X 8"
Materials: One skein of worsted weight cotton. Sample was done in Peaches & Crème Rose Pink.
Needles: U.S. Size 6 (4 mm)
Gauge: 4.5 sts. per inch, not critical
Abbreviations:
k = knit
p = purl
sts. = stitches
dec. = decrease
Pattern Notes: The border of this cloth may look like a straight seed stitch, however, in order to keep the defined scallop border, there are rows where the stitch sequence varies. If you keep this in mind and keep an eye on the pattern, you shouldn’t have any problems!
Pattern: Cast on 37 sts.
Row 1- 6: k1, p1 across row.
Row 7: k1, p1 for 7 sts.; [p3; k1, p1 for 7 sts.] 3 times.
Row 8: k1, p1 for 7 sts.; [p3; k1, p1 for 7 sts.] 3 times.
Row 9: k1, p1 for 6 sts.; [k5, p1, k1 for 5 sts.] 2 times; k5; p1, k1 for 6 sts.
Row 10: k1, p1 for 5 sts.; [p7, k3] 2 times; p7; k1, p1 for 5 sts.
Row 11: k1, p1 for 3 sts.; p2; k27; p2; k1, p1 for 3 sts.
Row 12: k1, p1 for 5 sts.; p27; k1; p1 for 5 sts.
Row 13: k1, p1 for 6 sts.; k12; p1; k12; p1, k1 for 6 sts.
Row 14: k1, p1 for 7 sts.; p10; k1, p1, k1; p10; k1, p1 for 7 sts.
Row 15: k1, p1 for 8 sts; k10; p1; k10; p1, k1 for 8 sts.
Row 16: k1, p1 for 6 sts., k2; p21; k2; p1, k1 for 6 sts.
Row 17: k1, p1 for 8 sts., k4; p1, k11; p1; k4; p1, k1 for 8 sts.
Row 18: k1, p1 for 7 sts.; p4; k1; p1; k1; p9; k1; p1; k1; p4; k1, p1 for 7 sts.
Row 19: k1, p1 for 6 sts.; k6; p1; k11; p1; k6; p1, k1 for 6 sts.
Row 20: k1, p1 for 5 sts.; p27; k1, p1 for 5 sts.
Row 21: k1, p1 for 3 sts.; p2; k13; p1; k13; p2; k1 for 3 sts.
Row 22: k1, p1 for 5 sts.; p12; k1; p1; k1; p12; k1, p1 for 5 sts.
Row 23: k1, p1 for 6 sts.; k12; p1; k12; p1, k1 for 6 sts.
Row 24: k1, p1 for 7 sts.; p23; k1, p1 for 7 sts.
Row 25: k1, p1 for 8 sts.; k4; p1; k11; p1; k4; p1, k1 for 8 sts.
Row 26: k1, p1 for 6 sts.; k2; p3; k1; p1; k1; p9; k1; p1; k1; p3; k2; p1, k1 for 6 sts.
Row 27: k1, p1 for 8 sts.; k4; p1; k11; p1; k4; p1, k1 for 8 sts.
Row 28: k1, p1 for 7 sts.; p23; k1; p1; for 7 sts.
Row 29: k1, p1 for 6 sts.; k12; p1; k12; p1, k1 for 6 sts.
Row 30: k1, p1 for 5 sts.; p12; k1; p1; k1; p12; k1, p1 for 5 sts.
Row 31: k1, p1 for 3 sts.; p2; k13; p1; k13; p2; k1, p1 for 3 sts.
Row 32: k1, p1 for 5 sts.; p27; k1, p1 for 5 sts.
Row 33: k1, p1 for 6 sts.; k6; p1; k11; p1; k6; p1, k1 for 6 sts.
Row 34: k1, p1 for 7 sts.; p4; k1; p1; k1; p9; k1; p1; k1; p4; k1, p1 for 7 sts.
Row 35: k1, p1 for 8 sts.; k4; p1; k11; p1; k4; p1, k1 for 8 sts.
Row 36: k1, p1 for 6 sts.; k2; p21; k2; p1, k1 for 6 sts.
Row 37: k1, p1 for 8 sts.; k10; p1; k10; p1, k1 for 8 sts.
Row 38: k1, p1 for 7 sts.; p10; k1; p1; k1; p10; k1, p1 for 7 sts.
Row 39: k1, p1 for 6 sts.; k12; p1; k12; p1, k1 for 6 sts.
Row 40: k1, p1 for 5 sts.; p27; k1, p1 for 5 sts.
Row 41: k1, p1 for 3 sts.; p2; k7; p1, k11; p1; k7; p2; k1, p1 for 3 sts.
Row 42: k1, p1 for 5 sts.; p6; k1; p1; k1; p9; k1; p1; k1; p6; k1, p1 for 5 sts.
Row 43: k1, p1 for 6 sts.; k6; p1; k11; p1; k6; p1, k1 for 6 sts.
Row 44: k1, p1 for 7 sts.; p23; k1, p1 for 7 sts.
Row 45: k1, p1 for 8 sts.; k10; p1; k10; p1, k1 for 8 sts.
Row 46: k1, p1 for 6 sts.; k2; p9; k1; p1; k1; p9; k2; p1, k1 for 6 sts.
Row 47: k1, p1 for 8 sts.; k10; p1; k10; p1, k1 for 8 sts.
Row 48: k1, p1 for 7 sts.; p23; k1, p1 for 7 sts.
Row 49: k1, p1 for 6 sts.; k25; p1, k1 for 6 sts.
Row 50: k1, p1 for 5 sts.; p27; k1, p1 for 5 sts.
Row 51: k1, p1 for 3 sts; p2; k27; p2; k1, p1 for 4 sts.
Row 52: k1, p1 for 5 sts.; p7; k3; p7; k3; p7; k1, p1 for 5 sts.
Row 53: k1, p1 for 6 sts.; [k5; p1, k1 for 5 sts.] 2 times; k5; p1, k1 for 6 sts.
Row 54: k1, p1 for 7 sts; [p3; k1, p1 for 7 sts.] 3 times.
Row 55: [k1, p1 for 7 sts.; p3] 3 times; k1, p1 for 7sts.
Row 56 - 60: k1, p1 across.
Bind off and weave in ends.
Thursday, July 9, 2009
What I did on my vacation..
Okay, so it really wasn't a real vacation. My son had to have surgery and since he's a bachelor, he needed some assistance. A whole week in Rhode Island, sounds lovely, doesn't it? It might have been, except for this incessant rain here in New England. I wonder if we'll have any summer at all? In any event, it was perfect weather for just sitting and knitting. I decided to make some shorties for Marty. This little green pair was done with Lamb's Pride in Christmas Green. I love cables, but they tend to cling a little too much, so I decided to space them out with plain stockinette panels.

For those of you who are familiar with soakers, you know that it's always a good idea to add short rows to the bum to accomodate the diaper. Unfortunately, with cables that's difficult to do. I solved this though by picking up an extra purl stitch across the backside in between the cables. I started after about three cable crossings and then when I got to the split for the legs, I just decreased all those extra stitches. As a result, there is plenty of room. I didn't really use a specific pattern. Since I knit so many of these, I know how many stitches to cast on for his size and I just sort of winged it. You could easily adapt this to your own favorite pattern. Just make sure the cast on is divisible by eight.

I also attempted another pair of Melanie's Sideways Britches. This is a test pattern that hasn't been published yet. It's a little more difficult than your average shorties pattern, but since the first pair I made fit so well, I decided to make another. Unfortunately, I wasn't paying as close attention as I should have been (blame it on the 47" high definition television!) and when I was almost done, I realized that I completely messed up the decreases across the bum! It was too complicated to try to figure out where I went wrong exactly, so I just started them from the beginning!

These are also done in Lamb's Pride in Sandy Heather. It's a nice color that should go with everything, including dirt from the sandbox! I might try another pair, but only because I took extensive notes, so I won't make the same mistake again!

I also managed to make a pair of socks for Marty. This is one of my favorite patterns. It's called "Swirling Confetti" . I used Plymouth Yarns Happy Feet with a U.S. size 2 needle and it came out a perfect size. I knit it exactly as written, except I used a 3 st. garter stitch heel flap. This is my favorite new way to make a heel flap as I really like the way the socks look, plus it's easy to pick up the stitches.

Finally, I finished another pair of socks that I was working on for Micah (with the huge feet). This time I used Cascade Fixation with a U.S. size 6 needle and the same pattern, except it has a plain heel flap.

They really aren't this orange. The yarn is more like terra cotta, but my camera just didn't want to pick up the right color. I used the same number of stitches for both pair of socks and you can see what a difference the yarn and needles make.

Next time I go to Rhode Island though, I hope to do a little more sightseeing and a little less knitting. It's a pretty little state and I spotted a lovely little yarn shop not too far away. I'm sure that qualifies as a tourist attraction!
Thursday, June 25, 2009
An Oldie
For those of you who read this blog (does anyone actually read it?), you might remember the Trucking Along bib that I did for the 2009 Dishcloth Calendar. The design has been released back to me and so I thought I would post it. This was definitely designed for the boys, but then again, who's to say that a girl can't play with trucks too?

This green bib was done with Cascade 220 Superwash wool and I used U.S. 4 needles. By using the thinner yarn and smaller needles, the bib is smaller. A perfect size to capture all that lovely drool!
Have you checked out the new online magazine yet? It's Petite Purls and it's devoted to infants, toddlers and children. It's like Knitty only for kids! The editors contacted me about submitting a design, but unfortunately, I can't make the next deadline, as I'm off to Rhode Island for a week to help my son after his upcoming surgery.
When I get back, I'll also post the directions for the bib I designed for the girls for last year's calendar. In the meantime, I hope the rain here in New England will finally end and we'll have some nice weather for a change. It's been raining so much, I now have mushrooms growing in my window boxes!!
Trucking Along Bib

Copyright 2008 by Elaine Fitzpatrick. Permission is granted to make and sell items from this pattern provided that credit is given to me as the designer. Permission is not granted to reproduce the actual pattern, or post it, or distribute it, without my express permission. Please respect my copyright and play nice!
Difficulty: Easy
Size: approximately 8.75" from neck edge to bottom and 8" wide
Materials: One skein of worsted weight cotton if you are using the bib for meals. If, on the other hand, you want to use it as a “drool” bib, I recommend using a superwash wool. The cotton has a tendency to absorb the moisture, whereas the superwash wool will wick the moisture and keep baby nice and dry!
Needles: Size 6
Gauge: 4.5 sts. per inch, not critical
Abbreviations:
k = knit
p = purl
sts. = stitches
dec. = decrease
dpn. = double pointed needle
B5 = seed stitch border
Pattern Notes: The edges of the bib are worked in seed stitch over the first and last five stitches (k1, p1, k1, p1, k1) and are referred to as “B5”. You might find it helpful to insert a marker after the first five stitches and before the last five stitches.
When you reach the I-cords on the bib, it is helpful, but not necessary, to drop down a needle size to make the cords slightly smaller.
Pattern: Cast on 12 sts.
Row 1: (right side) k1, p1, across row.
Row 2: Cast on 3 sts., k1, p1 across row. (15 sts.)
Row 3: Cast on 3 sts., p1, k1 across row (18 sts.)
Row 4: Cast on 3 sts., p1, k1, across row (21 sts.)
Row 5: Cast on 3 sts., k1, p1, across row (24 sts.)
Row 6: Cast on 3 sts., k1, p1, across row (27 sts.)
Row 7: Cast on 3 sts., p1, k1, across row (30 sts.)
Row 8: Cast on 2 sts., k1, p1, across row (32 sts.)
Row 9: Cast on 2 sts., p1, k1, across row (34 sts.)
Row 10: Cast on 2 sts., k1, p1, across row (36 sts.)
Row 11: Cast on 2 sts., p1, k1, across row (38 sts.)
Row 12: k1, p1, for 13 sts.; p12 sts.; p1, k1, for 13 sts.
Row 13: p1, k1, for 12 sts.; k14 sts.; p1, k1 for 12 sts.
Row 14: k1, p1, for 11 sts.; p16 sts.; p1, k1, for 11 sts.
Row 15: p1, k1, for 10 sts.; k18 sts.; p1, k1 for 10 sts.
Row 16: k1, p1, for 9 sts.; p20; p1, k1 for 9 sts.
Row 17: p1, k1 for 8 sts.; k22; p1, k1 for 8 sts.
Row 18: k1, p1 for 7 sts., p24; p1, k1 for 7 sts.
Row 19: p1, k1 for 6 sts.; k9; p3; k7; p3; k4; p1, k1 for 6 sts.
Row 20: k1, p1 for 5 sts; p4; k1; p3; k1; p5; k1; p3; k1; p9; p1, k1 for 5 sts.
(Note: From this point on, the first and last five stitches are the seed stitch border. (B5) It might be helpful to place a marker for these stitches.)
Row 21: B5; k9; p1; k3; p1; k5; p1; k3; p1; k4; B5.
Row 22: B5; p4; k1; p3; k1; p5; k1; p3; k1; p9; B5.
Row 23: B5; k6; p4; k3; p7; k3; p3; k2; B5.
Row 24: B5; p2; k1; p2; k3; p5; k1; p1; k3; p3; k1; p6; B5.
Row 25: B5; k6; p1; k7; p1; k10; p1; k2; B5.
Row 26: B5; p2; k1; p10; k1; p7; k1; p6; B5.
Row 27: B5; k6; p1; k7; p1; k10; p1; k2; B5.
Row 28: B5; p2; k1; p10; k1; p7; k1; p6; B5.
Row 29: B5; k7; p3; k4; p1; k10; p1; k2; B5.
Row 30: B5; p2, k1; p10; k1; p3; k1; p10; B5.
Row 31: B5; k10; p1; k3; p1; k10; p1; k2; B5.
Row 32: B5; p2; k1; p10; k5; p10; B5.
Row 33: B5; k14; p12; k2; B5.
Row 34: B5; p28; B5.
Row 35: B5; k28; B5.
Row 36: B5; p28; B5.
Row 37: B5; k28; B5.
Row 38: B5; p28; B5.
Row 39: B5; k5; p3; k7; p3; k10; B5.
Row 40: B5; p9; k1; p3; k1; p5; k1; p3; k1; p4; B5.
Row 41: B5; k4; p1; k3; p1; k5; p1; k3; p1; k9; B5.
Row 42: B5; p9; k1; p3; k1; p5; k1; p3; k1; p4; B5.
Row 43: B5; k2; p3; k3; p7; k3; p4; k6; B5.
Row 44: B5; p6; k1; p3; k3; p1; k1; p5; k3; p2; k1; p2; B5.
Row 45: B5; k2; p1; k10; p1; k7; p1; k6; B5.
Row 46: B5; p6; k1; p7; k1; p10; k1; p2; B5.
Row 47: B5; k2; p1; k10; p1; k7; p1; k6; B5.
Row 48: B5; p6; k1; p7; k1; p10; k1; p2; B5.
Row 49: B5; k2; p1; k10; p1; k4; p3; k7; B5.
Row 50: B5; p10; k1; p3; k1; p10; k1; p2; B5.
Row 51: B5; k2; p1; k10; p1; k3; p1; k10; B5.
Row 52: B5; p10; k5; p10; k1; p2; B5.
Row 53: B5; k2; p12; k14; B5.
Row 54: B5; p28; B5.
Row 55: B5; k28; B5.
Row 56: B5; p28; B5.
Row 57: B5; k28; B5.
Row 58: B5; p28; B5.
Row 59: (right side) B5; k 8; k1, p1 for 12 sts.; k8; B5.
Row 60: B5; p 7 sts.; k1, p1 for 14 sts.; p7 sts.; B5.
Row 61: p1, k1, for 6 sts.; k 5 sts.; k1, p1 for 16 sts.; k 5 sts; p1, k1, for 6 sts.
Row 62: k1, p1, for 7 sts.; p 3 sts.; k1, p1, for 18 sts.; p 3 sts.; p1, k1, for 7 sts.
Row 63: p1, k1, across row.
Row 64: k1, p1 across row.
Shoulder Shaping:
Row 65: k1, p1 for 13 stitches; bind off the next 12 stitches knitwise, and work the remaining stitches in the established seed stitch. You should have 13 sts. on each side.
Next row: p1, k1 across and place first 13 stitches on a holder. Work on remaining 13 sts. as follows:
Note: As you look at the bib, this will be the left side. All the decreases are made on right side rows. I have included a couple of tips below.
(Right side) Dec. 1 st. at neck edge every other row 2 times. (11 sts.)
(Tip: I find it easiest to decrease these neck stitches by slipping the first stitch knitwise, then knitting the next stitch, and passing the slipped stitch over the knitted stitch. Because the cotton is heavy, it can be a little difficult to slip two stitches and then knit them together.)
Work one row.
(Right side) Dec. 1 st. at shoulder edge every other row until 5 sts. remain. (For these decreases, you should knit the last two stitches together.)
Work one row.
(Right side) Dec. 1 st. at neck edge and 1 st. at shoulder edge. 3 sts.
Slip these 3 sts. to a dpn and work an I-cord for approximately 12 inches. Fasten off and run end down through middle of I-cord. Don’t worry if the I-cords look a little wonky. A firm tug will usually straighten them out and after the bib is washed, you won’t even notice! A good tutorial for making the I-cords can be found here: http://www.knittinghelp.com/videos/knitting-tips
Join yarn to neck edge and work right side to correspond to the left side.
(Tip for right shoulder) Join the yarn at the neck edge and knit across row. On the next row (right side), decrease at the neck edge by knitting the last two stitches together. For the shoulder edge, decrease by slipping the first stitch knitwise, knitting the next stitch, and then passing the slipped stitch over the knitted stitch.)
Weave in ends.
Trucking Along Cloth

Copyright 2008 by Elaine Fitzpatrick. Permission is granted to make and sell items from this pattern provided that credit is given to me as the designer. Permission is not granted to reproduce the actual pattern, or post it, or distribute it, without my express permission. Please respect my copyright and play nice!
Difficulty: Easy
Size: approximately 8.50" X 8"
Materials: One skein of worsted weight cotton.
Needles: U.S. Size 6 (4 mm)
Gauge: 4.5 sts. per inch, not critical
Abbreviations:
k = knit
p = purl
sts. = stitches
dec. = decrease
Pattern Note: The edges of the washcloth are worked in seed stitch over the first and last five stitches (p1, k1, p1, k1, p1) and are referred to as “B5”. You might find it helpful to insert a marker after the first five stitches and before the last five stitches.
Pattern: Cast on 38 sts.
Row 1: p1, k1 across row.
Row 2: k1, p1 across row.
Row 3: p1, k1 across row.
Row 4: k1, p1 across row.
Row 5: p1, k1 across row.
Row 6: k1, p1 across row.
Row 7: p1, k1 for 5 sts.; k28; k1, p1 for 5 sts.
Row 8: k1, p1 for 5 sts.; p28; p1, k1 for 5 sts.
(Note: From this point on, the first and last five stitches are the seed stitch border. (B5) It might be helpful to place a marker for these stitches.)
Row 9: B5; k28; B5.
Row 10: B5; p28; B5.
Row 11: B5; k28; B5.
Row 12: B5; p28; B5.
Row 13: B5; k10; p3; k7; p3; k5; B5.
Row 14: B5.; p4; k1; p3; k1; p5; k1; p3; k1; p9; B5.
Row 15: B5; k9; p1; k3; p1; k5; p1; k3; p1; k4; B5.
Row 16: B5; p4; k1; p3; k1; p5; k1; p3; k1; p9; B5.
Row 17: B5; k6; p4; k3; p7; k3; p3; k2; B5.
Row 18: B5; p2; k1; p2; k3; p5; k1; p1; k3; p3; k1; p6; B5.
Row 19: B5; k6; p1; k7; p1; k10; p1; k2; B5.
Row 20: B5; p2; k1; p10; k1; p7; k1; p6; B5.
Row 21: B5; k6; p1; k7; p1; k10; p1; k2; B5.
Row 22: B5; p2; k1; p10; k1; p7; k1; p6; B5.
Row 23: B5; k7; p3; k4; p1; k10; p1; k2; B5.
Row 24: B5; p2, k1; p10; k1; p3; k1; p10; B5.
Row 25: B5; k10; p1; k3; p1; k10; p1; k2; B5.
Row 26: B5; p2; k1; p10; k5; p10; B5.
Row 27: B5; k14; p12; k2; B5.
Row 28: B5; p28; B5.
Row 29: B5; k28; B5.
Row 30: B5; p28; B5.
Row 31: B5; k28; B5.
Row 32: B5; p28; B5.
Row 33: B5; k5; p3; k7; p3; k10; B5.
Row 34: B5; p9; k1; p3; k1; p5; k1; p3; k1; p4; B5.
Row 35: B5; k4; p1; k3; p1; k5; p1; k3; p1; k9; B5.
Row 36: B5; p9; k1; p3; k1; p5; k1; p3; k1; p4; B5.
Row 37: B5; k2; p3; k3; p7; k3; p4; k6; B5.
Row 38: B5; p6; k1; p3; k3; p1; k1; p5; k3; p2; k1; p2; B5.
Row 39: B5; k2; p1; k10; p1; k7; p1; k6; B5.
Row 40: B5; p6; k1; p7; k1; p10; k1; p2; B5.
Row 41: B5; k2; p1; k10; p1; k7; p1; k6; B5.
Row 42: B5; p6; k1; p7; k1; p10; k1; p2; B5
Row 43: B5; k2; p1; k10; p1; k4; p3; k7; B5.
Row 44: B5; p10; k1; p3; k1; p10; k1; p2; B5.
Row 45: B5; k2; p1; k10; p1; k3; p1; k10; B5.
Row 46: B5; p10; k5; p10; k1; p2; B5.
Row 47: B5; k2; p12; k14; B5.
Row 48: B5; p28; B5.
Row 49: B5; k28; B5.
Row 50: B5; p28; B5.
Row 51: B5; k28; B5.
Row 52: B5; p28; B5.
Row 53: B5; k 28; B5.
Row 54: k1; p1 across row.
Row 55: p1, k1 across row.
Row 56: k1; p1 across row.
Row 57: p1, k1 across row.
Row 58: k1; p1 across row.
Row 59: p1, k1 across row.
Bind off and weave in ends.
Subscribe to:
Posts (Atom)